
Creating quotes in Salesforce is an essential part of the sales process. Quotes help sales teams provide accurate pricing information to customers and streamline the overall sales workflow. Salesforce offers a comprehensive set of tools and features to create quotes efficiently and effectively.
To create a quote in Salesforce, follow these simple steps:
- Step 1: Enable Quotes: Before creating quotes, make sure the quote functionality is enabled in your Salesforce org. This can be done by going to Setup > Feature Settings > Quotes and enabling the Quotes option.
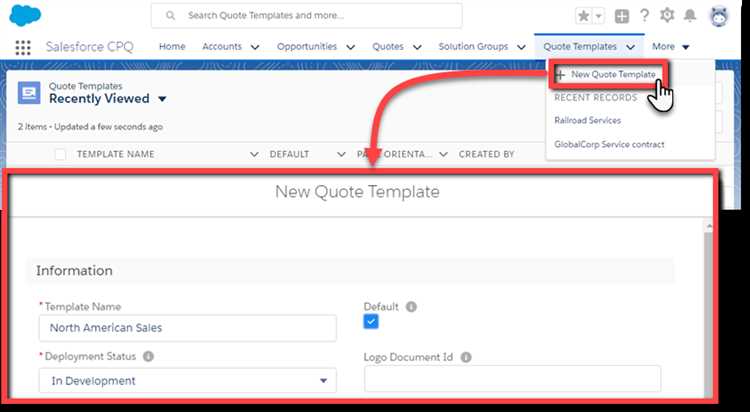
- Step 2: Create a Quote Template: Once quotes are enabled, the next step is to create a quote template. A quote template defines the layout and format of your quotes. You can create multiple templates to suit different needs and customize them according to your branding and design preferences.
- Step 3: Add Products: After setting up the quote template, you need to add products to your quote. Products can be added manually or imported from your product catalog. You can specify product details such as quantity, price, and discounts.
- Step 4: Calculate Totals: Once products are added, Salesforce automatically calculates the subtotals, taxes, and grand totals based on the specified pricing and discounts. This ensures accurate pricing information for your customers.
- Step 5: Customize and Finalize: Salesforce allows you to customize the quote by adding additional information, such as terms and conditions, shipping details, or any specific notes. You can also customize the quote layout and format using HTML or a Visualforce page. Once the quote is finalized, you can send it to the customer for review.
Creating quotes in Salesforce not only simplifies the sales process but also ensures accuracy and consistency in pricing information. By following these steps, you can create professional quotes that impress your customers and help close deals effectively.
Remember, creating quotes in Salesforce is just a part of the larger sales process. Make sure to leverage other Salesforce tools and features, such as opportunity management and pipeline tracking, to maximize your sales success.
Salesforce Quote Creation
Creating a quote in Salesforce is a straightforward process that allows you to generate accurate and professional quotes for your customers. Follow these steps to create a quote in Salesforce:
- Log in to your Salesforce account and navigate to the Sales app.
- Click on the “Quotes” tab in the navigation menu to access the Quotes home page.
- Click on the “New Quote” button to create a new quote.
- Fill in the necessary details for the quote, such as the customer name, opportunity, expiration date, and currency.
- Add line items to the quote by clicking on the “Add Line Item” button. Enter the product or service details, quantity, and price for each line item.
- Specify any discounts or taxes that apply to the quote by entering the appropriate values in the designated fields.
- Review the quote details and make any necessary changes or adjustments.
- Click on the “Save” button to save the quote.
Once the quote is created, you can easily generate a PDF version of it to share with your customer. The quote can also be sent via email directly from Salesforce.
By following these simple steps, you can efficiently create quotes in Salesforce and provide your customers with accurate and professional pricing information for your products or services. This streamlined process can help improve your sales efficiency and enhance the overall customer experience.
Steps to Create a Quote in Salesforce
In Salesforce, creating a quote allows you to provide a formal document to your customers, outlining the products or services they are interested in purchasing. Here are the steps to create a quote in Salesforce:
- Navigate to the Quotes Tab: In Salesforce, click on the “App Launcher” icon in the top-left corner and search for “Quotes”. Click on the “Quotes” tab to open it.
- Create a New Quote: Click on the “New” button to create a new quote. This will open a new quote record page.
- Enter Quote Details: Fill in the necessary information for the quote, such as the customer name, opportunity, and expiration date. You can also add additional details like quote description, discount, and terms and conditions.
- Add Quote Line Items: Click on the “Add Line Item” button to add products or services to the quote. Search for the product or service you want to add, specify the quantity, and set the price if necessary.
- Review and Edit Quote: Review the quote details and line items to ensure accuracy. You can edit the line items or remove them if needed.
- Submit or Send the Quote: Once you have reviewed the quote, you can either submit it for internal approval or send it directly to the customer. Click on the “Submit for Approval” button or the “Email Quote” button to take the appropriate action.
- Track Quote Status: After submitting or sending the quote, you can track its status in Salesforce. You can see if it is pending approval, approved, rejected, or sent to the customer.
Creating quotes in Salesforce allows you to streamline your sales process and provide a professional and organized quote to your customers. By following these steps, you can easily create and manage quotes in Salesforce to ensure accurate and timely communication with your customers.
Understanding Quote Object
The Quote object is an important component in the Salesforce platform that helps businesses streamline their sales processes by creating and managing quotes. It allows sales representatives to generate professional-looking quotes for their products and services, enabling them to close deals more efficiently.
Here are some key points to understand about the Quote object:
- Definition: The Quote object in Salesforce is a standard object that allows users to create, modify, and track quotes. It is typically used in conjunction with other objects, such as Opportunities or Accounts, to facilitate the sales process.
- Fields: The Quote object has various fields that capture important details related to the quote, such as quote number, quote date, expiration date, total amount, discount, and more. These fields can be customized to meet specific business requirements.
- Relationships: The Quote object can be related to other objects within Salesforce, such as Opportunities, Accounts, or Contacts. This allows for seamless integration and data sharing between different parts of the sales process.
- Quote Line Items: A key feature of the Quote object is the ability to add quote line items, which represent individual products or services included in the quote. These line items capture important details like quantity, unit price, and total amount, helping to provide a comprehensive overview of the quote.
- Quote Templates: Salesforce provides the ability to create and customize quote templates that determine the layout and design of the quotes generated from the Quote object. These templates can be tailored to match the branding and style of the business.
- Workflow and Approval Processes: The Quote object can be incorporated into workflow and approval processes, allowing for automated routing and approval of quotes based on predefined criteria. This helps to ensure consistency and streamline the quote approval process.
- Reporting and Analytics: Salesforce offers robust reporting and analytics capabilities for the Quote object. Users can generate reports and dashboards to gain insights into sales performance, quote conversion rates, and other key metrics.
Understanding the Quote object is crucial for businesses that rely on Salesforce for their sales processes. By leveraging the capabilities of the Quote object, businesses can effectively manage their quotes and improve their overall sales effectiveness.
Setting Up Quote Layout
Once you have set up your Salesforce account and enabled the Quotes feature, you can start customizing the layout of your quotes. The quote layout determines the arrangement and appearance of the information displayed on your quotes, making it easier for your sales team to generate professional and comprehensive quotes.
To set up the quote layout, follow these steps:
- Go to the Salesforce Setup page by clicking on the gear icon in the top right corner of your Salesforce account and selecting “Setup”.
- In the left sidebar, under the “Platform Tools” section, click on “Object Manager”.
- In the Object Manager page, search for and click on “Quote” to open the Quote object page.
- In the Quote object page, click on “Fields & Relationships” in the sidebar.
- Here, you will see a list of all the fields available for the quote object. You can customize the layout by rearranging the fields, adding new fields, or removing existing fields.
- To rearrange the fields, simply click on the field you want to move and drag it to the desired position.
- To add a new field, click on the “New” button and follow the prompts to create a new field. Once created, you can drag it to the desired position in the layout.
- To remove a field, click on the field you want to remove and click on the “Delete” button.
- Once you have finalized the layout, click on the “Save” button to save your changes.
In addition to rearranging and customizing fields, you can also create sections and subsections to better organize your quote layout.
By setting up your quote layout, you can ensure that all the necessary information is easily accessible and displayed in a clean and organized manner, making it more efficient for your sales team to create quotes and communicate with customers.
Adding Products to Quote
Once you have created a quote in Salesforce, the next step is to add products to it. Adding products to a quote allows you to specify the items or services that the quote is for, along with their quantities and prices. This helps in providing an accurate quote to your customers.
To add products to a quote, follow these steps:
- Login to your Salesforce account and navigate to the Quotes section.
- Select the quote you want to add products to.
- Once you are on the quote page, look for the “Products” section.
- Click on the “Add Products” button to open the product selection window.
- In the product selection window, you can search for the products you want to add by entering their names or using any other available filters.
- Select the products you want to add by checking the checkbox next to their names.
- Specify the quantity and price for each selected product.
- Click on the “Add Selected Products” button to add the products to the quote.
After adding the products to the quote, you can review the product details and make any necessary changes. You can also add additional products or remove any products if needed. Once you are satisfied with the product selection, you can proceed with finalizing the quote and sending it to the customer.
Adding products to a quote in Salesforce is a crucial step in accurately quoting your customers. By following these simple steps, you can ensure that your quotes include all the necessary products and their relevant details.
Configuring Quote Pricing
The pricing for a quote in Salesforce can be configured by following these steps:
- Create Price Books:
- Add Products to Price Books:
- Set Default Price Book:
- Define Price Rule Entries:
- Configure Discount Schedules:
- Apply Pricing to Quotes:
Price Books contain the list of products and their associated prices. Before configuring the quote pricing, create price books by going to the “Price Books” section in the Salesforce Setup menu. You can create multiple price books based on different pricing models or customer segments.
Once the price books are created, add the products that you want to include in the quotes. Make sure to specify the prices for each product in the respective price book. You can add products by selecting the price book and navigating to the “Products” tab.
Specify the default price book that should be used for quotes. This can be done by going to the “Quotes” section in the Salesforce Setup menu and selecting the desired default price book. The default price book will be used when creating new quotes.
Price Rule Entries allow you to define specific pricing rules for different products or product categories. You can set discounts, markups, or custom pricing logic based on various criteria like quantity, customer type, or specific date ranges. Define the price rule entries by going to the “Price Rule Entries” section in the Salesforce Setup menu.
If you want to offer discounts based on predefined schedules, you can set up discount schedules. This allows you to define bulk discounts, promotional discounts, or any other discount structure that fits your pricing strategy. Go to the “Discount Schedules” section in the Salesforce Setup menu to configure discount schedules.
After completing the above configurations, you can apply the configured pricing to quotes. When creating a quote, select the desired price book, and Salesforce will automatically apply the associated prices and any applicable discounts based on the defined price rules.
Once the quote pricing is configured, you can generate accurate and consistent quotes for your customers, ensuring transparency and efficiency in the sales process.
Generating Quote PDF
Once you have created a quote in Salesforce, you may need to generate a PDF version of it to send to your customers or for record-keeping purposes. Salesforce provides a simple way to generate a quote PDF that includes all the relevant information.
To generate a quote PDF, follow these steps:
- Navigate to the quote record you want to generate a PDF for.
- Click on the “Print” button located at the top of the record.
- In the print preview window, you can customize the layout of the PDF by selecting the desired options.
- Click on the “Generate PDF” button to create the PDF version of the quote.
Once the PDF is generated, you can save it to your computer or print it directly. The PDF will include all the information from the quote, such as product details, pricing, terms and conditions, and customer information.
Generating a quote PDF in Salesforce allows you to easily share quotes with your customers and keep a record of the quote for future reference. It provides a professional-looking document that can be customized to meet your specific needs.
Sending Quote to Customers
Once you have created a quote in Salesforce and reviewed it for accuracy, it’s time to send it to your customers. This step is crucial as it allows your customers to review the details of the quote, make any necessary adjustments, and ultimately decide whether to accept or decline the offer.
There are several ways to send a quote to your customers in Salesforce:
- Email: You can send the quote as an email attachment directly from Salesforce. This is a quick and efficient way to deliver the quote to your customer’s inbox.
- Print and Mail: If your customers prefer a physical copy of the quote, you can print it and mail it to them using traditional mail services.
- Download: Another option is to download the quote as a PDF file and send it to your customers through a file-sharing platform or attach it to an email.
Regardless of the method you choose, it’s important to personalize the message accompanying the quote. Address the customer by name and thank them for their interest in your products or services. You can also provide contact information in case they have any questions or need further assistance.
It’s crucial to track the status of the quote after sending it to customers. Salesforce provides features to help you monitor whether the customer has received, opened, or accepted the quote. This information can be used to follow up with the customer and address any concerns or questions they may have.
In addition to sending the quote to customers, Salesforce also allows you to track the history of interactions related to the quote. This includes any communication, revisions, or approvals made throughout the quoting process.
Sending quotes to customers is an essential step in the sales cycle. It allows you to keep the lines of communication open, build rapport with customers, and increase the likelihood of closing the deal.
Remember to maintain a professional and prompt approach when sending quotes to customers. A well-crafted and personalized quote can make a significant impact on the customer’s decision-making process.
Question and answer:
What is Salesforce?
Salesforce is a cloud-based customer relationship management (CRM) platform that helps companies manage their sales, marketing, and customer service activities. It provides businesses with a complete view of their customers, including their contact information, communication history, and purchase history.
Why is creating a quote important in Salesforce?
Creating a quote in Salesforce is important because it allows sales teams to provide accurate pricing information to customers and helps in generating sales. It streamlines the quotation process, reduces errors, and ensures consistency in pricing across different deals. Additionally, quotes in Salesforce can be easily tracked and managed throughout the sales cycle.
Can I customize the quote template in Salesforce?
Yes, you can customize the quote template in Salesforce to match your brand’s look and feel. Salesforce provides a template editor that allows you to modify the layout, fonts, colors, and other design elements of the quote. You can also add your company logo and include custom fields or merge fields to personalize the quote template further.