
Typography plays a crucial role in graphic design, and quotes are an excellent way to emphasize important messages or add a touch of visual interest to your project. In Adobe InDesign, hanging quotes adds an elegant and professional look to your text. Hanging quotes are when the quotation marks appear outside the text frame, creating a visually appealing design element.
To hang quotes in InDesign, follow these simple steps:
- Select the text frame where you want to add the hanging quote.
- Highlight the text that includes the quote you want to hang.
- Go to the “Paragraph” panel and click on the “Bullets and Numbering” option.
- Check the “Hanging Punctuation” box. This will make the quotation marks hang outside the text frame.
- Adjust the settings according to your preferences, such as the indentation and space before or after the quote.
- Click “OK” to apply the changes.
Note that the hanging quote feature is available in Adobe InDesign CC and later versions. If you’re using an older version, you may need to upgrade to access this functionality.
Pro tip: Experiment with different fonts, sizes, and styles to create visually striking hanging quotes that complement your overall design.
By following these easy steps, you can quickly and effectively hang quotes in Adobe InDesign to enhance the visual impact of your designs. Whether you’re working on a magazine layout, brochure, or any other project, hanging quotes can elevate the typography and make your text more engaging and eye-catching.
Getting started and importing text
Before you can hang quotes in InDesign, you need to have your text ready and imported into the software. Follow these steps to get started:
- Open InDesign and create a new document by selecting “New Document” from the “File” menu.
- Set up your document’s dimensions, margins, and any other necessary settings. Make sure to choose the appropriate page size and orientation for your project.
- Click on the “Place” tool in the toolbar or press the “Ctrl+D” shortcut to import your text. In the dialog that appears, navigate to the location of your text file and click “Open”.
- The loaded cursor will appear. Click anywhere on the page to place the text or click and drag to define the area where you want the text to be placed.
- If your text is too lengthy for the defined area, it will overflow and show a red plus symbol. To adjust the overflow, simply click and drag on the red plus symbol to create a dynamic text frame that fits all the text.
- To style and format your imported text, use the various options available in the character and paragraph panels. You can adjust the font, size, leading, alignment, and other properties to make your text visually appealing.
Once you have imported and formatted your text, you can proceed to the next steps to hang the quotes in InDesign.
Formatting the text
Once you have added the text for your quote in InDesign, you can start formatting it to make it visually appealing. Here are some steps to guide you through the process:
- Choose an appropriate font: Select a font that matches the style and tone of your quote. You can experiment with different fonts to find the one that best suits your design.
- Adjust the font size: Increase or decrease the font size to make the quote legible and visually balanced. Remember to maintain consistency in font sizes throughout your design.
- Apply font styles: Use bold or italic styles to add emphasis to certain words or phrases in your quote. This can help draw attention to key points or create a visual hierarchy.
- Set line spacing: Adjust the line spacing to ensure readability. You can increase or decrease the space between lines to make the text more visually appealing.
- Align the text: Choose the alignment that best suits your design. You can align the text to the left, right, center, or justify it to create a clean and organized look.
- Apply color: Add color to your text to make it stand out. Select a color that complements your design and enhances the overall aesthetic.
- Format paragraphs: Use indentation or bullet points to format your quote if needed. This can help break down the quote into smaller, easier-to-read sections.
By following these steps, you can ensure that your text is well-formatted and visually appealing in your InDesign document. Remember to save your work frequently and keep experimenting with different formatting options until you achieve the desired result!
Choosing the right font and style
When it comes to hanging quotes in InDesign, choosing the right font and style is essential. The font and style you choose can greatly impact the overall look and feel of your design. Here are some important factors to consider when selecting the font and style:
- Readability: Choose a font that is easy to read and does not strain the reader’s eyes. Avoid fancy or overly decorative fonts as they can make the text look cluttered and hard to read.
- Consistency: For a unified look, use the same font throughout your design. This will create a sense of cohesiveness and make your quotes appear as part of a cohesive set.
- Contrast: Aim for contrast between the quote text and the background to ensure the words stand out. Black or dark-colored text usually works best on light backgrounds, while light-colored text can be used on dark backgrounds.
- Font size: Ensure the font size is large enough to be easily readable, yet small enough to fit within the designated space. Experiment with font sizes to strike the right balance.
- Font style: Consider using different font styles to add visual interest and variety to your design. For example, you can use bold or italic styles for emphasis or to highlight key words or phrases.
Remember to keep your choice of fonts and styles consistent with the overall theme of your design. Experiment with different combinations to find the perfect fit for your quotes.
Adjusting the leading and tracking
Once you have selected the quote and adjusted the typeface, it’s time to fine-tune the spacing between the lines and characters. InDesign provides options to adjust the leading and tracking, which can greatly affect the overall appearance of the quote.
Leading:
Leading refers to the vertical space between lines of text. By adjusting the leading, you can control the distance between each line in the quote. To adjust the leading:
- Select the quote that you want to adjust.
- Go to the Character panel in the Control panel.
- Locate the Leading option and use the up and down arrow buttons or manually input a value to increase or decrease the leading.
Experiment with different leading values until you find the spacing that looks best for your quote.
Tracking:
Tracking refers to the horizontal space between characters. It allows you to control the overall density of the text. To adjust the tracking:
- Select the quote that you want to adjust.
- Go to the Character panel in the Control panel.
- Locate the Tracking option and use the up and down arrow buttons or manually input a value to increase or decrease the tracking.
Increasing the tracking value will add space between characters, while decreasing it will tighten the spacing. Experiment with different tracking values to achieve the desired effect for your quote.
Remember, finding the perfect balance between leading and tracking can greatly enhance the readability and aesthetics of your quote in InDesign.
Create a text frame for the quote
Before you can hang a quote in InDesign, you need to create a text frame where the quote will be placed. Follow these steps to create a text frame:
- Open InDesign and create a new document or open an existing one where you want to place the quote.
- Select the “Type Tool” from the toolbar on the left side of the screen.
- Click and drag on the canvas to create a rectangular shape for the text frame. You can make the frame as large or as small as you want, depending on the size of your quote.
- Once you release the mouse button, the text frame will be created. You can adjust the size and position of the frame by clicking and dragging its edges or corners.
Now that you have created a text frame, you are ready to add the quote to it. In the next section, we will cover how to import text into InDesign and format it to make it visually appealing.
Aligning the quote with the text
In order to align the quote with the text in your InDesign document, you can use the following steps:
- Select the quote and the corresponding text.
- Navigate to the “Align” panel by going to Window > Object & Layout > Align.
- In the “Align” panel, click on the desired alignment option, such as “Align Left Edges” or “Align Right Edges”.
- You can also use the “Distribute Spacing” buttons in the “Align” panel to evenly distribute the space between the quote and the text.
- Alternatively, you can use the “Align to” dropdown menu in the “Align” panel to align the quote with a specific element, such as a text box or a frame.
- After aligning the quote with the text, you may need to adjust the position of the quote manually by dragging it or using the arrows on your keyboard.
By aligning the quote with the text, you can ensure that they appear visually cohesive and create a professional and polished look in your InDesign document.
Applying special effects and enhancements
Once you have positioned your quotes in InDesign, you can apply special effects and enhancements to make them more visually appealing. Here are some options:
- Font styling: Change the font type, size, and color to create a visually appealing quote. Experiment with different combinations to find the one that best fits your design.
- Drop shadows: Add a drop shadow effect to make the quote stand out from the background. Adjust the opacity, angle, and distance of the shadow to achieve the desired effect.
- Outer glow: Apply an outer glow effect to create a soft glowing halo around the quote. Adjust the color, opacity, and size of the glow to enhance the quote’s visibility.
- Stroke: Add a stroke around the quote to give it a defined border. Choose the stroke color, thickness, and style to match your design.
- Texture and patterns: Apply a texture or pattern fill to the quote for a more unique look. Experiment with different options to find one that complements your design.
Remember to use these effects and enhancements sparingly, as excessive use can make the quotes look cluttered and distracting. It’s important to balance aesthetics with readability to ensure that the quotes are easy to read and understand.
Exporting and saving the final design
Once you have finished creating your design in InDesign, the next step is to export and save the final file. InDesign provides several options for exporting your document, depending on the desired output format.
If you want to share your design online or through email, you can export it as a PDF. This will ensure that your document retains its formatting and can be viewed by anyone with a PDF reader. To export as a PDF, go to File > Export > Adobe PDF. Choose the desired options such as page range, compression, and security settings, and then click Export.
If you need to print your design, you can export it as a high-resolution print-ready file. InDesign supports various print file formats such as TIFF, EPS, and JPEG. To export as a print file, go to File > Export > Format and select the desired file format. Specify the file name, location, and other options, and then click Export.
In addition to exporting, it is always a good idea to save your InDesign document for future reference or further editing. To save your document, simply go to File > Save or File > Save As if you want to save it with a different name or in a different location.
It is recommended to also save your document in the native InDesign format (.indd) to preserve all the layers, links, and other elements of your design. This allows you to make changes later on without losing any of your work. To save as an InDesign document, go to File > Save As and select the .indd format.
By exporting and saving your final design, you ensure that it can be shared, printed, and edited in the future. Remember to keep multiple backups of your files, both in the exported format and the native InDesign format, to avoid any potential loss of your work.
Question and answer:
What is InDesign?
InDesign is a professional desktop publishing software developed by Adobe Systems. It is widely used for creating and designing posters, brochures, magazines, and other printed materials.
Can I hang quotes in InDesign?
Yes, you can hang quotes in InDesign. By adjusting the settings in the Paragraph panel, you can easily create hanging quotes in your text.
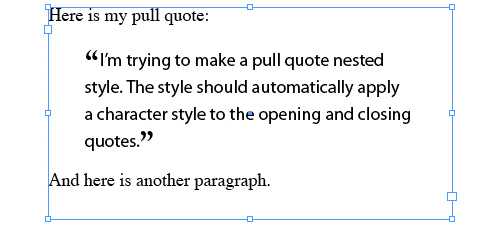
What is a hanging quote?
A hanging quote is a typographical style where the quotation mark is placed outside the text block, creating a visually appealing and unique design element. It is often used to highlight important or memorable quotes in a text.
Can I customize the appearance of the hanging quotes?
Yes, you can customize the appearance of the hanging quotes in InDesign. By adjusting the settings in the Paragraph panel, you can change the size, color, and style of the quotation marks. You can also adjust the spacing and alignment to achieve the desired look.
Are there any alternative methods to create hanging quotes in InDesign?
Yes, there are alternative methods to create hanging quotes in InDesign. You can use the Type on a Path tool to create a curved or angled text path and then place the hanging quote along the path. This allows for more creative and unique designs.